 When it comes to Fiber to the Home (FTTH) installations, microduct is a common choice to protect optical fiber due to its size. This blog post offers best practice advice on installing buried microduct, to help deliver faster, more effective deployments.
Methods of installation
There are four ways of installing direct buried microduct:
- In the ground by machine or hand excavating
- In a micro or slot-cut trench
- Using a mole plow
- Inside an existing large diameter duct
For each of these, you should take a number of key steps ahead of installation. Firstly, always cut the microduct with a manufacturer-supplied tube cutter; secondly, before installation, make sure that the sealing plug is in place at the ends of the microduct to prevent dirt and water entering the duct; and lastly, make sure the draw cord is trapped in place by the sealing plug.
With these steps taken, let's now consider best practices for each of the four installation methods in turn:
1) Best practice for Direct in Ground (DIG) installations
Essentially this involves excavating a trench by hand or by machine, and then installing the microduct directly in the ground, before replacing the subsoil and surface. Follow these best practices to achieve an efficient and long-lasting installation:
- Bury microduct deep enough in the ground to prevent it being damaged by other utilities, rodents, tree roots and freezing ground water
- Ensure the bottom of the trench is level so that the microduct lies flat; this makes installing the fiber in the duct easier
- Avoid sharp bends in the duct to make fiber installation easier
- If possible, put a layer of clean fill in the bottom of the trench before installing the microduct to prevent damage by stones
- Backfill above and to the side of the microduct, to prevent damage by stones when you compact the backfill above the microduct
- When installing an access box, support the microduct to maintain its alignment where it passes through the access box
2) Best practice for micro trenching installations
Micro trenches (or slot trenches) are cut into hard surfaces, such as roads and footpaths. Microduct is then installed at the bottom of the shallow, narrow trench which is typically around 12 mm (0.5 inch) wide. Follow these best practices when micro trenching:
- Ensure the bottom of the trench is level so that the microduct lies flat, to ease fiber installation in the duct
- The bottom and sides of the slot trench must be dry and clear of debris
- Avoid sharp bends in the duct to make fiber installation simpler
- Depending on the roughness of the bottom of the slot, backfill the trench before installing the microduct, to prevent damage by stones
- Backfill above the microduct to prevent damage
- Optionally, install a backer rod (polycord) above the top backfill to prevent damage to the microduct from the reinstatement
3) Best practice for mole plow installations
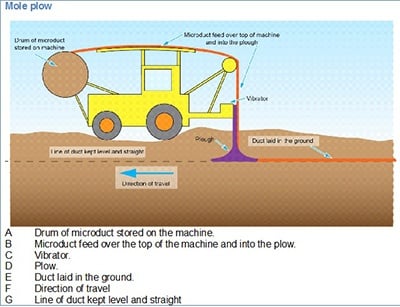
Used on a tractor or excavator, a mole plow cuts a slot similar to a farmer’s plow, with the microduct fed along its back edge and drawn into the hole made in the ground by the tip of the plow. There are two types of plows - vibrating and non-vibrating. The vibrating plow is used where there are roots or small stones in ground because it cuts through the roots and pushes stones out of the way. Follow these best practices when mole plowing:
- Ensure the ground is even – otherwise, as the mole plow follows the ground contours the route that the microduct takes may not be level
- Bends in the route must be smooth and wide; if the route is not level and the bends are tight cabling distance is reduced
- Mole plow only where there are no hard surfaces and there are unlikely to be other services
- Choose a machine suitable for the type of ground: for soft ground, you will need a machine with wide profile tires or with tracks so that the machine does not sink into the ground
- If tree roots or small stones are present use a vibrating plow
- Choose a machine that carries the microduct with it - do not lay the microduct out on the ground to be pulled after the machine, because it will be damaged and stretched
4) Best practice for microduct in duct installations
When installing microduct in larger ducts, follow these best practices to achieve optimum results:
- Calculate if there is sufficient space in the duct
- Allow an extra length of duct to compensate for the stretching that happens as the microduct is drawn into the duct
- Allow for expansion of the microduct if air temperatures or storage temperatures are high.
- Allow 24 hours to pass before restraining the microduct to allow it to reach the same temperature as the duct and jointing chamber
- When using a winch to pull in the microduct, do not exceed the maximum pulling force, by using a mechanical fuse; a fuse is not required if pulling in the microduct by hand
- Always use a swivel to prevent the microduct twisting as it is pulled into the duct
- Always use a pulling sock to distribute the pulling force over the first part of the microduct
Microducts are a key part of many fiber deployments across the globe. However, as with any type of installation, things can go wrong, adding to time and cost. Therefore, following best practice and using high quality equipment is critical to ensuring successful deployments, time after time.


Comments